
Welcome to CitSci.org. We’re glad you’ve decided to start a new project. If you’re not sure where to start or want some tips, then you’re in the right place. In this tutorial, we explain step by step how to create a project and start navigating the tools we offer.
Do I need an account?
Yes! You are welcome to view much of our site and data without an account, but if you want to add data, create a project, or do any of the really fun stuff, you’ll need to have an account. Your account will allow you to manage any projects you are involved with, keep track of data, and communicate with us and project collaborators.
Great – Now how do I set up a project?
When you create a project on CitSci.org, you’ll be asked to fill out information about the following: Project Name, Description, Goals and Tasks. You’ll also be asked to upload a banner photo and a logo or small graphicor image to represent your project. We’ll walk through each of these sections below.
ProTip: Consider spending some time thinking about each section ahead of time and then come back to the form to fill them out.
STEP 1: Create a Project
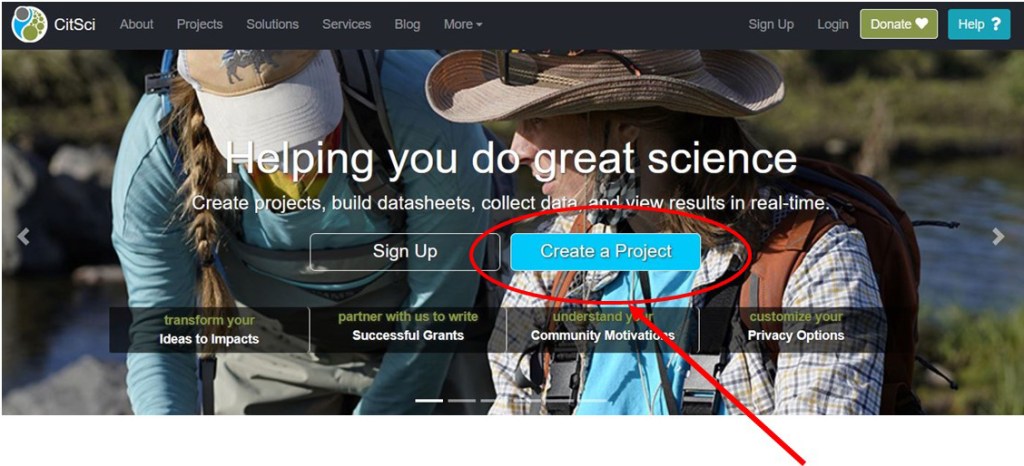
When you’re ready to begin, navigate to the CitSci.org homepage. Click the blue “Create a Project” button in the middle of the page. If you already have an account, you will be prompted to sign in. If you do not already have a account, click the green “Sign Up” button to create one, and then resume the Create a Project Step. You’ll now be directed to the “Create a Project” page.

ProTip: If you need to walk away from your Create a Project page for a while, no problem! Just scroll to the bottom of the page and click “Save as Draft”. You can come back and edit the fields at any time.
STEP 2: Tell Us About Your Project
Follow the bold prompts to enter basic information about your project. All of the fields are required. We’ll go through each of the fields below.
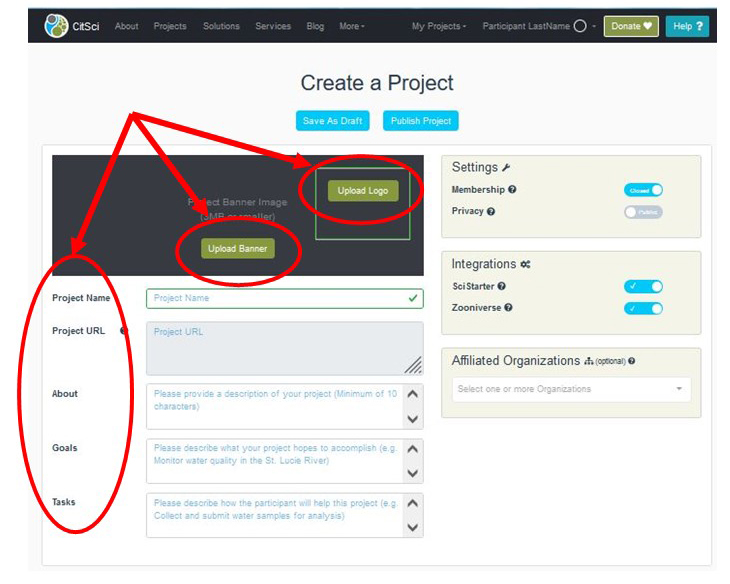
Project Name
The most effective project names are simple and descriptive! Think about what you’re studying, who’s taking the measurements, and the location you’re focused on. For example, “Larimer County Backyard Rainfall” is descriptive enough to give you an idea about where the project takes place (Larimer County) and that it involves tracking backyard rainfall. The current character limit for the Project Name field is 100 characters.
ProTip: Make sure the title would make sense to an outsider who has never heard of it or seen it before.
Description
When it comes to your project description, think about the who, what, when, where, why of your project. What would someone seeing your project for the first time need to know? Tell them that in 60 words or less (because 60 is the current word limit for the description field). Check out the Utah Water Watch project for a good example of a project description.
Goals
Why do we ask you to write down your goals? Because knowing why a project has been created and what it is intended to accomplish is important to motivating your participants. For the Goals section, state the purposes, objectives, and research questions you are trying to accomplish. Go ahead and be a little verbose here. The goals field supports up to 8000 characters in a paragraph style format (it doesn’t yet support bullet/number style lists but we’re working on it). Check out the Stream Tracker project goals under “Project Details’ on their project page for a great example.
Tasks
The tasks section is where you provide information about what the participants in your project will be doing if they choose to sign up. You can include things like measurements they will make, the type of data they will collect, outreach they may be a part of, and more. The Tasks field supports up to 8000 characters in a paragraph style format (it doesn’t yet support bullet/number style lists but we’re working on it). Check out the Alaska Birds N’ Bogs tasks under “Project Details” on their project page for an example of Tasks.
Photo
Upload a photo of your project to showcase what you are all about. If your project has a logo, this is a great place to put it. If you don’t have a logo, upload a picture that represents the organisms or environment or something else about your project. Your photo/image needs to be 200×150 pixels, in jpg or png format. The maximum file size that can be uploaded is 5MB.
STEP 3: Choose Project Settings
Navigate to the grey box on the right side of the screen to set additional project settings for Membership, Privacy, Email, and SciStarter. The question mark circles next to each item have more information about each of these settings. We’ll also go through each of them below.
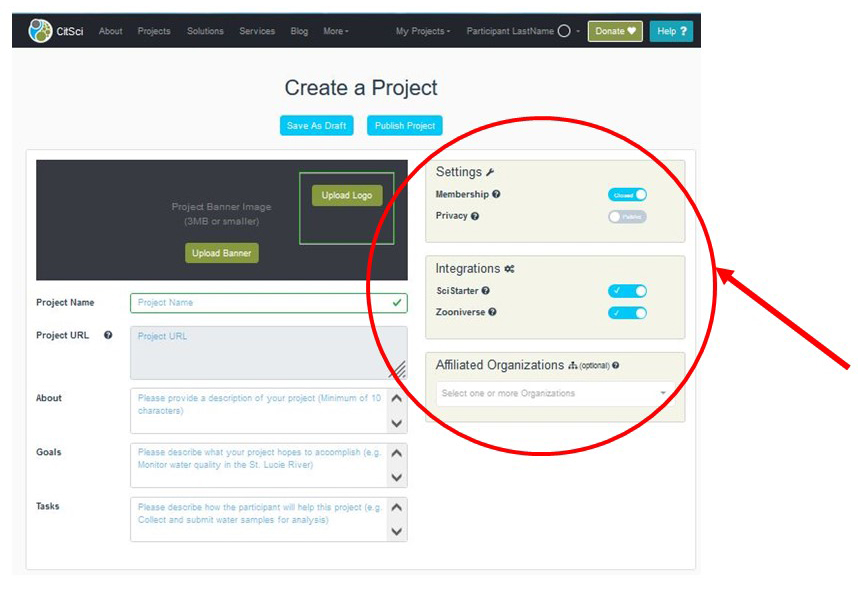
Membership (Open or Closed)
This option allows you as the project manager to choose whether volunteers need to be approved or not before joining your project. For example, you may be running a project that requires participants to attend an in-person training before they can submit data. If that is the case, you may want to select “Closed” membership. Or, you may be running a BioBlitz where you want anyone to be able to participate without needing prior approval. In that case, you may want to select Open membership.
Privacy (Public or Private)
If your project’s privacy mode is set to Public, your data will be viewable by anyone. If you choose Private, only project members can view the data. The majority of CitSci.org projects choose to make their data public, but there are projects that need to keep their data private to protect the species being monitored or due to requirements from a grant funder or any number of other reasons. You as a project manager know the privacy needs for your project best and can decide what setting to choose.
Email (On or Off)
The Email setting allows you to decide whether or not participants registered for your project can email you and other project coordinators through your CitSci.org project page. Most projects turn this feature on so that they can maintain open channels of communication with participants. If you set this toggle to Off, your participants will need to use other channels of communication to get in touch with you.
SciStarter (Check or Uncheck)
SciStarter is an online community and search engine dedicated to improving the citizen science experience for project managers and participants. Over 3,000 projects and events are searchable by location, scientific topic, and age level. CitSci.org and SciStarter are linked behind the scenes so that if you set your SciStarter toggle to Check, your project will automatically be added to the SciStarter database and will be searchable and discoverable by the SciStarter community.
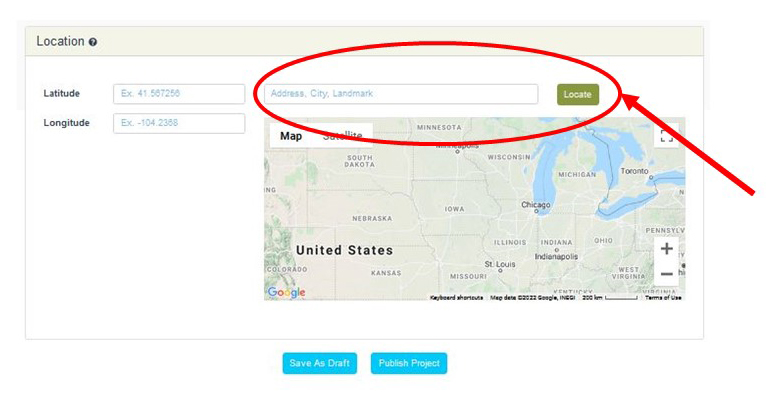
STEP 4: Set Your Project Location
Here you’re setting the general location of your project, not necessarily the exact location where you will be collecting data. For example, if you are located at a nature center, your location might be the headquarters for that center. Or if your project is run by a Friends of a State Park group, your location might be a building at the State Park where you meet. In a different tutorial, we’ll go over how you create a datasheet (or sheets) for collecting data for your project and that is where you enter more specific site locations for data collection.

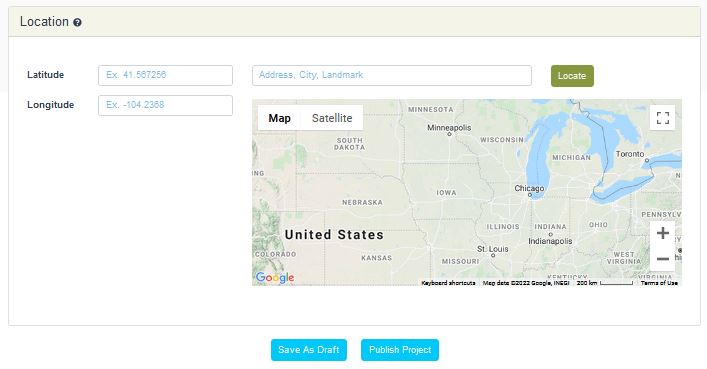
Navigate to the bottom of the page to choose “Project Location”. You can enter Latitude/Longitude points if you have access to them, or type your location into the “Address, City, Landmark” bar and click “Locate”. This will automatically enter the Latitude/Longitude points.
ProTip: If it’s difficult to pinpoint one location for your project, set the main headquarters as your location.
STEP 5: Click Publish Project!
Congratulations! Once you have filled out each field completely you’re ready to click “Publish Project” at the bottom of the page. You did it! You will now be redirected to the new homepage for your project.
And that is how you create a citizen science project on CitSci.org. Watch for additional tutorials about creating datasheets, setting up predefined locations for your participants, and more!
More CitSci.org Tutorials
How to Add Locations for Predefined Sampling Sites to a NEW Datasheet
How to Add Locations for Predefined Sampling Sites to an EXISTING Datasheet

3 comments on “How to Create Your Citizen Science Project on Citsci.org in 5 Easy Steps”